
Installing Early
One-Piece Windows
Installing one-piece windows in a Beetle is one of the oldest
modifications you can do to give your car that unique California Look. Doing
away with the vent glass gives the car a smoother, more modern appearance. It
also does away with one of the chief entry areas for car thieves— the vent
window. My experience is with the early kits that require the regulators out of
a '65-'68 Bug. As with nearly everything I do, I like to take my time. Be
prepared to install these kits over the course of a weekend.
I have also included a section on the snap-in
seal kits that became available a few years back (to sum it up: I don't like
them at all). Check out my Power Windows article if you are interested in
installing the Barrett Enterprises power window kit in your Bug. If you need to
buy a new set of window regulators for your one-piece window installation
anyways, putting that money towards this kit means that power windows are only
about $150 US!
Here's a list of some of the things you'll need...
- 10mm wrench or socket
- hammer & chisel
- rubber mallet
- flat screwdriver
- 3M Weatherstrip Adhesive (#08011 or
equivalent)
- Automotive Goop™ Adhesive
- black silicone
- sharp razor blade
- masking tape
- small (torpedo) level
- tin snips or shears
- clothespins
- small punch
- drill
- small round file
- window regulators and sashes from a
'65-'68 Bug (for pre'65 cars)
- can of contact cement (latex
preferred) and small brush (both optional)
- Dynomat™, Dead Beat™, or other sound
deadening material (optional)
- snap-in lip seals (optional)
- 5' tall inflatable Yak (optional)
- I am
writing this presuming that you will be installing your one-piece window kit
over a weekend, taking your time, and allowing things to dry before moving on.
(Friday night)
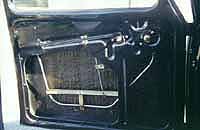
First, remove the door handles and window
cranks by tapping out the pins that secure them to the shafts (you will have to
push the door panel into the door a bit to get at them). Remove the door panel
afterwards by gently prying it away from the door using the flat screwdriver.
Next, remove the stock window regulator and glass from the door. Remove the
U-shaped run channels, as well as the lip seals that run along the bottom of the
opening.
Next, remove the vent window. It should be
held in by two screws and a 10mm bolt. Remove these and the vent assembly & post
will pull straight up and out. Remove the rubber surrounding the opening at this
time as well.
If you look down into the door, you will
notice a metal channel directly below where the vent window used to be. You can
use either a hammer & chisel or a drill to either break away or drill out the
spot welds that secure the channel inside the door. Break loose the weld on the
metal tabs under the channel afterwards and bend the tabs down and out of the
way. Once you're done, line the entire length of the newly exposed sheet metal
at the bottom of the window opening (not just the vent window area) with a
couple of layers of masking tape to prevent scratching the glass as you test fit
everything.
Next, locate the holes for the window
regulators. Hold the regulator up against the sheet metal of the door and locate
the window crank shaft over the center of the original location. Transfer the
location of one of the mounting holes as best you can. Use a small drill bit to
drill the hole and use a small round file to enlarge it later. Then install the
regulator inside the door with the back of the regulator still outside the door
(you will see why in a moment). Install one of the two mounting bolts in the
hole you just made to secure the front of the regulator. Then using a small
level, take a reading on the level of the bottom of the door. Take note of where
the bubble lies and move the level up to the horizontal brace of the regulator.
Then lift up on the back of the regulator until you get an identical reading
(you will want the bottom of the regulator to be parallel with the bottom of the
door). Mark the rear mounting hole and remove the regulator from the door.
Create the rear mounting hole as you did the first and then install the
regulator properly inside the door. Secure the regulator at the rear location.
Next, take the U-shaped run channels and
bend them so that they follow the shape of the window opening. The run channels
are longer than necessary and the excess material should be used at the back of
the glass, not at the front. The fabric material may want to separate from the
rubber of the run channel at the point where you bend it. If it does, simply
make a relief cut in the fabric and use some weatherstrip adhesive (3M part
#08011) to rebond it. Install the run channel into the window opening (you can
use masking tape to hold in place until the next step).
Lower the glass down into the door and
rotate it until it is upright, then lower it into the sashes of the window
regulator and roll up the window tight. The glass should fill the window opening
perfectly. If not, slot the two holes you have just created until the glass fits
level inside the opening. Once you have everything level, mark the positions of
the bolt heads on the sheet metal. Remove the glass and the regulator, position
the regulator against the door, and drill out the third hole. Reinstall the
regulator using all three mounting holes (make sure the bolts you use aren't too
long that they interfere with the glass) and reinstall the door glass. Allow the
run channel to drop down and apply some contact cement to it and the metalwork
inside the window opening where the run channel will bond. Let it dry until
tacky and reposition the run channel, rolling up the window to hold it in place
while it dries.
(Saturday)
Mark the postion where the glass fits into
the U-shaped sash attached to the window regulator (mark both the sash and the
glass). Remove the glass from the car and remove the sash from the regulator
(make a note as to which way it faces inside the door). Use the piece of cork or
rubber material included with your new sashes (you will have to come up with
your own material if you are using used sashes) and wrap it over the edge of the
bottom edge of the glass where it will fit inside the sash. Line up the sash
with the bottom of the glass (making sure it is right-side up) and gently tap it
on to the glass with a rubber mallet. Once the sash is tight and fully seated,
reinstall the glass and let it rest at the bottom of the door. Optionally, you
can use something like Automotive Goop™ to bond the glass to the sash inside
the door if the lip seals are all ready installed (you may need to do this if
you were replacing a broken window). I talk more about the Goop™ method at the
end of my Power Windows article. You can remove the masking tape along the
bottom of the window opening at this point.
The next step is to secure the four felt
lip seals along the inner and outed edges of both doors. Now I prefer the
old-style felt seals over the newer snap-in seals for a number of reasons.
Firstly, the clips don't really secure the strips securely enough. Second, the
rubber-to-glass fit was extremely tight, creating a lot of friction that
had the seals flipping over every time you tried to lower the glass (the seals
would actually cock slightly when you tried to roll the glass up, bringing the
bottom of the seal in contact with the glass which increased the friction even
more). Third, the soft pliable nature of the snap-in seals is a bit too supple,
creating a wavy-like fit if the seal and glass weren't perfectly— and I mean
perfectly— parallel. Finally, they were actually more work to install
than the old seals. Ooh— and they're more expensive to boot!
Normally the felt lip seals will fit pretty
tightly when the glass is installed. Optionally, you can trim off about 1mm from
the lip of each seal to increase the available space between the lip seals so
that the glass doesn't fit quite as tight. Don't worry... the lip seals don't
have to press against the glass hard to wipe the water off when you roll the
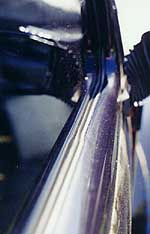
glass down and up. I even trimmed a bit more of the lip away on the outboard
sealing strips, beginning at a point where the original vent window post was,
forward (the sheet metal makes a noticable shift inboard at this point and I
bent the lip seal slightly to follow its contour; see image at right). Accurate
trimming was accomplished using a small, hand-held device that used to be
available in many hobby shops. It is normally used to cut thin, parallel strips
of balsa from a larger sheet. I only trimmed mine because I already owned such a
device (you may want to see if you can even find one first).
When one-piece window kits first came out,
many people simply installed the felt lip seals as straight components. The ends
of the seals would dissappear into the voids of the lower corners of the window
opening, looking far from factory. Some people, however, trim the ends of the
felt strips so that they can curve up at the ends to match the curvature of the
lower corners ofthe window opening. This is what I did for my '56 and what I
just finished doing for my '63.
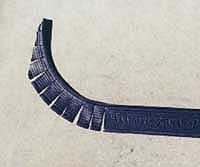 Beginning
about four inches from each end, make a cut in the metal-reinforced area every
¼" all the way to the ends. Make the cuts using a pair of metal tin snips or
shears, cutting right up to the small lip that lines up with the top of the
door. All that relief cutting will cause the seal to warp slightly but you can
flatten it out very easily. Next, gently bend the ends upwards in graceful arcs
to match the window opening as close as possible. Once you have the lip seal
bent correctly trim off the excess as I have shown in the following photograph.
This is necessary to clear the U-shaped run channel at each end. Beginning
about four inches from each end, make a cut in the metal-reinforced area every
¼" all the way to the ends. Make the cuts using a pair of metal tin snips or
shears, cutting right up to the small lip that lines up with the top of the
door. All that relief cutting will cause the seal to warp slightly but you can
flatten it out very easily. Next, gently bend the ends upwards in graceful arcs
to match the window opening as close as possible. Once you have the lip seal
bent correctly trim off the excess as I have shown in the following photograph.
This is necessary to clear the U-shaped run channel at each end.
Next, get a good brand of weatherstrip
adhesive (3M part #08011) and smear a thin, even layer over the entire contact
area of both outboard lip seals, as well as the sheet metal to where they will
be bonded. All surfaces should be as clean as you can get them. Be sure to
distribute the adhesive in the window opening over the entire contact area as
well. Let it dry for at least fifteen minutes before bonding the seals in place
(you should apply the adhesive in the shade so that it does not dry out). Secure
it in place with clothespins from up inside the door and let it sit for a few
hours (the more time the better and overnight drying is preferable if you have
the time).
Now is a good time to fabricate the lower
mount. You will need a piece of stiff metal about 1" wide by 6" long for each
door. Place the mount at the bottom of the door and drill a hole to mount it.
Line up the top of the mount so that the tab at the bottom of the window
regulator is between you and your new mount. Drip a hole and bolt the regulator
to the mount.
Once the outer lip seals have had
sufficient time to dry, use the same procedure to secure the inboard seals
(remembering to wait at least fifteen minutes before bonding). Clamp it in place
with clothespins and let them all dry overnight. You want the adhesive
absolutely dry before you install the glass (you don't want the lip seals
peeling away from the metalwork when they flex against the glass as it rolls up
and down). You can see how the lip seal conforms to the contoured sheet metal at
the point where the factory vent window post was while remaining straight where
it comes in contact with the glass.
(Sunday)
Once the lip seals have had plenty of time
to dry, remove the clothespins and reconnect the sash (and glass) to the window
regulator. Roll the window up and down and make sure that everything works
right. If the window glass doesn't want to roll up inside the run channel, you
can grab the regulator at the bottom near the rear edge of the door and pull
backwards (an inch is all it takes!). Contrary to what I've read in the
instructions that come with the kit, you want to do this with the regulator
firmly mounted inside the door. To unbolt everything except one forward bolt
like the instructions suggest could very well mean that the sash will end up too
far forward on the glass (the instructions mention that the rear mounting hole
may need to be redrilled, resulting in the glass being located further
rearward). You may still need to adjust your fabricated lower mount afterwards,
however.
Once everything is dry, apply a small bead
of black silicone along each outside seal between the metal and the seal itself.
Lay two pieces of masking tape down on either side of where the silicone will
go, leaving approximately a 4-5mm gap between them. Apply the silicone and use
your finger to smooth it in place. Excess silicone will flow out and on to the
masking tape. Once you have it nice and smooth, peel away the tape (and the
excess silicone along with it).
|