
![]()
![]()

![]()
|
|
|
|
When it comes to headlight we desperately wanted to improve the candle-like lighting on our 1303 project. Luckily we were able to get replacement H4 units and correct single-screw headlight rims. Our 1303 project came fitted with the pre-August ’73-type headlights, the kind that use a separate headlight lens and reflector all fitted to the rim using the beam adjuster screws. The update we wanted to make was to fit the post-August ’73-style units. These feature a sealed beam unit that screws to three metal tabs inside the headlight bowl itself. The rim then fits over the top with just one single mounting screw, and looks much tidier. While speaking to our Car parts dealer, we found out that, as well as the sealed beam units, they sold genuine Hella H4 halogen conversion units, as well as an alternative H4 kit. These kits would allow us to fit higher wattage bulbs-better than the factory lighting. As well as the halogen beam units, we also needed the matching single screw headlight rims and. Of course, some suitable halogen bulbs. H4 fitting bulbs are available from any good auto spares shop and we chose a pair of 60/55W Blue Light bulbs – a useful upgrade over the old 45/50W bulbs we had. H4 bulbs fit in place with three small tabs, but will not fit a regular bulb holder – H4 only. There are much more powerful bulbs available, too. We saw 80/100W and even 100/120W – for off-road use only, of course – but consider the condition of your wiring and the rating of all the components before buying anything as powerful as that. We checked our wiring right through and replaced the last section, but if you were to use a bulb of a higher wattage than the 60/55W, you would need to use a relay kit with more heavy-duty wiring. These kits are readily available from auto accessory shops, but it might be worth consulting an auto-electrician before going ahead. There’s nothing worse than overloading the system and having an electrical fire, or finding out that your old dynamo isn’t up to the job of feeding your new halogen lighting. These H4 units are exactly the same as those used in the Mk1 Golf. This means that many of the after market ‘clear vision’ units will fit right in place, too. Bare in mind, though, that many of these are only available with LHD beam patterns and, while many shops will be happy to sell them to you, you’ll have problems when MoT time comes and your lights are beaming the wrong way. If you are going for a factory look – even though the H4 units give a very different look to the car’s front – you can also use the small chrome trim ring that fits over the edge of the factory sealed beam unit under the rim. We didn’t have this trim piece, and had also stripped the chrome and painted the rims black with a chrome rim, the inner trim rings finish things off nicely.
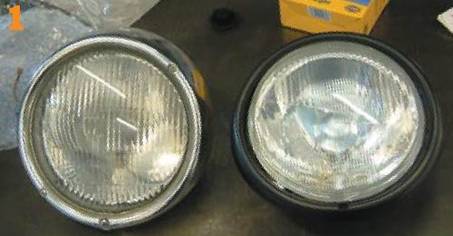
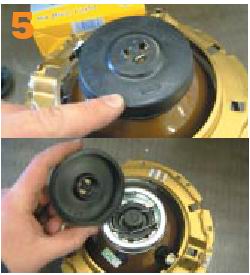
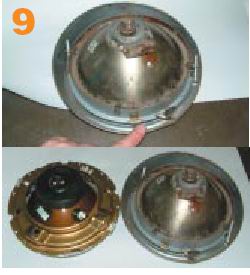
on the left are the old three screw headlight rims that came with our car, while on the right are the new H4 units and one screw rims we’ll be fitting. Being a late model car, the wings were fitted with three metal tabs inside the headlight bowls to fix the new units to. Many replacement pattern wings we’ve seen come with the tangs and the traditional one screw fixing, so you could, in theory, run either type of light. The earlier sort is a combination unit with integral headlight rim. The beam is adjusted by the two smaller screws while the whole unit is held in place by the large bottom screw. Late units screw into three tabs on the wing and the rim is fitted separately with a single bottom screw.
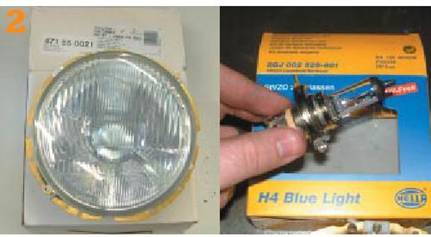
Our brand new H4 light units had the part number of 471 55 0021 and they have the correct RHD lens pattern. The light unit themselves come ready to fit and include the bulb holder clip, rubber seal and even the sidelight holder, but don’t include any of the bulbs. The beauty of using the H4 units is that there is a huge range of halogen bulbs available to fit them. Note that the beam adjustment is all taken care of by two screws on the unit itself, i.e. under the rim. With the units fitted to the wings, these screws align things and then, when it’s done, the outer rim fits over the top. Here is the difference in the look of the units on the lens face. The original unit has a damaged glass and obviously has three screws in the rim. The new H4 unit is much flatter and looks far tidier thanks to only having one screw on the outer rim.
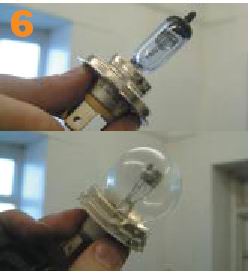
This how to spot an H4 lamp – it’s got it written on the lens itself. Remember when handling halogen bulbs that you shouldn’t touch the glass part as it will damage the bulb. We chose higher power 60/55W bulbs and went for the blue look.
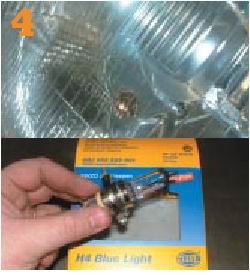
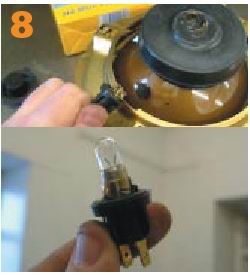
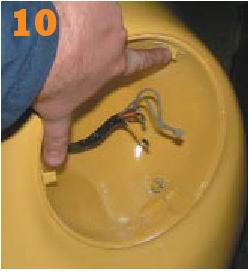
The back of the unit is kept dry and safe thanks to this larger rubber seal that should come supplied with the unit. Remove the seal to find the clip and the socket that holds the bulb in place. These units had a plastic blank that needed to be removed.
Here you can see the difference between our new blue halogen bulb and the old 45/55W regular headlamp bulb. Being a halogen unit, there are loads of more powerful bulbs out there – even 100/120’s, but you may have legal problems with these – but you’ll need to upgrade the wiring first.
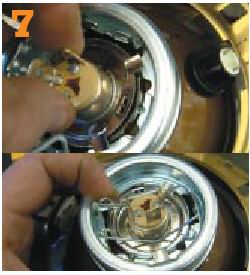
The bulb slots into the socket and is located by three tabs that protrude from the bulb base. Don’t panic, the bulb will only fit in one way round, so you can’t get it in upside down or anything like that. This spring clip is all that holds it in place, so make sure it locates home fully and locks tight.
Next up is the sidelight. We pinched the bulb from our old unit, but it might be worth buying a new one and keeping the old ones in the car as spares. Bulb has a bayonet fitting and the holder is a twist fir into the back of the unit. Make sure the holder screws in tight and can’t work loose.
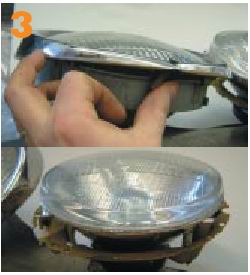
Here you can see what we mean about the old and new units. The old unit is complete with the rim, which is an integral part of the adjuster mechanism – hence the screws in the rim. The new unit fixes to the wing and has its own holder cage that features adjuster screws hidden under the rim.
These are the three tabs that hold the new H4 unit in place inside the headlight bowl. Self tapping screws will do the job nicely into pattern wings, although you may need to tweak the tabs around to get it all lined nicely. Best to do this before painting, as ours needed plenty of twisting.
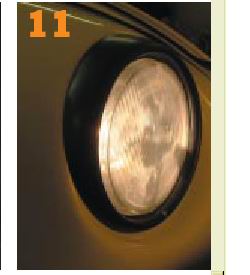
Once we had replaced the old wiring with fresh heavy-gauge, we connected it all up, screwed the unit in place and fired the lights up so we could align the beams. Once we were happy that they weren’t up in the air, we fitted the rims, we’ll take it to the MoT centre to set them up properly.
|
|
Send mail to
eagleeye@searchmalta.com with
questions or comments about this web site.
|