
By A.J. Sims of Lowbugget.com
Once all of the machining
for your new performance VW motor is complete and you have mocked up the
rotating assembly, its time to wash and assemble. But wait, you may think it is
clean after you give it that good spray at the local car wash, but it's not! You
must have access to the main oil galley to properly clean the internal passages
of loose debris or machining chips. To do this, you need to remove and replace
the stock/ factory pressed in plugs with threaded plugs. This way, you can
thoroughly clean your oil galleys and reseal them. Follow along as we
demonstrate how to remove the plugs and tap the galley for new plugs.
Here
is a list of the tools you will need:
-
Slide hammer
-
Center marking punch
-
Large flat screwdriver
-
Oil plunger removing tool
-
Small hammer (to remove the oil plunger)
-
3/8" ratchet and a 16mm, 12-point socket or the
correct socket for the tap
-
3/8" NPT bottoming tap.
-
Drill
-
9/16" drill bit
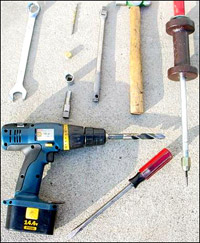
A
starter drill bit for your slide hammer (The extra wrench is for my slide
hammer, because the handle was stripped out to screw it in.)
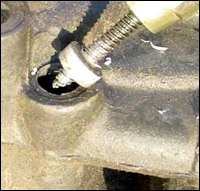
The
first step - and this is really important - is to remove the old oil plungers.
The large screw sometimes comes out quickly and easily, but if it is stubborn,
then grab the small hammer. Give it a tap on the edge in a counter-clockwise
direction (that's why all the used ones look so beat up).
If your plunger is stuck
you may need a puller to remove it.

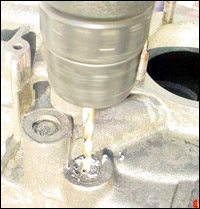
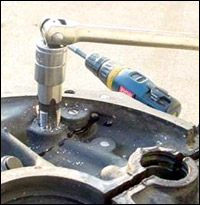
Use a
center punch and drill a "starter hole" for your slide hammer. Don't drill it
too big, as it only needs to be big enough for the threads to grab onto. If you
had left the plunger in, you would have just drilled into it and screwed it all
up. It becomes very hard to remove after this!
Screw in the slide hammer at least a ¼", ensuring that it gets a good grab (look
at the next picture for depth). Start slide hammering.
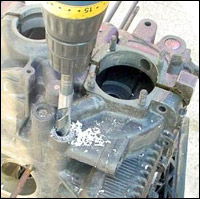
You can see how far the slide hammer needs to screw in.
Use the drill and a 9/16"
bit. Notice the milk crate under the case; it helps hold the case, ensuring that
it does not turn as you drill. Do not drill too deeply - approximately a 1/2" -
and keep checking, as the magnesium case is easy to drill into.
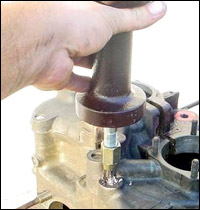
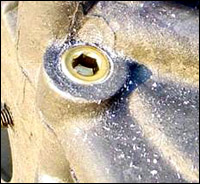
Tap it
with the 3/8" NPT tap. You may want to keep checking with your plug for depth.
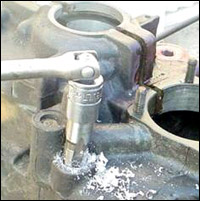
I did not have a bottoming
tap so off to the grinder. I took off about a ¼" and re-shaped it to its
original starting shape end.
For the back of the case,
you will have to take the same steps. Just pay special attention to the depth of
the plug, as the rear cam bearing oiling hole and plunger hole are closer than
on the front.
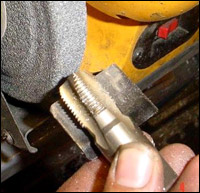
Now
this is the final result and approximately how deep you will want it. It
looks good and will help with the cleaning of your new or old case.To reseal
the new plugs, use some removable Loctite. I do not recommend Plumber's tape
or Teflon tape, as this will give you a false impression of how much torque is
applied to each plug.
I hope
that you find this technical article informative.
|