
![]()
![]()

![]()
|
|
|
|
BY COURTNEY HOOK DISCLAIMER: PLEASE READ:This is the process I
used after much research to Port and Polish my own heads. In no way am I
suggesting that this is or is not accurate information. It was taken from many
sources, such as How to HotRod VW's, articles from All About VW Performance
Engines Book 2, and various other articles from VW magazines. Use this
information at your own risk, standard disclaimers apply.
This variable speed Dremel Tool and Bits are what it is all about. These perform the work for you, and all you have to devote is the time. It took me about 6 hours all told, to do one head. I used bits no. 9906 and 9912 for the majority of the porting. Spray the aluminum areas you are working on with WD-40 before you start grinding to prevent loading up the tool. Again, realize these are only suggestions and not the gospel! You can use any bits you like, as long as you have a steady hand, and remove the metal the way you want.
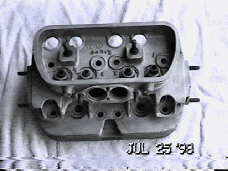
These are what your heads should look like before you start working on them. These heads have been degreased with "Gunk" then bead blasted in a booth with glass beads. Never use sandblasting, it is too abrasive!
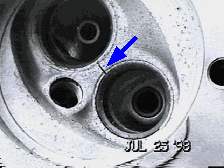
Watch carefully for cracking between the exhaust and intake valves. Notice here that the crack is very obvious. This crack is about 1 mm deep, and after being inspected by two different head shops the consensus was that it was okay to use, provided it had not travelled any farther than just the surface you see. THIS IS YOUR CALL! I used this head and it has been fine. If in doubt have it welded or replaced.
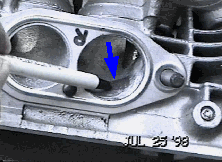
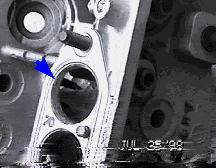
The pen is pointing to a potential danger area where you DO NOT want to grind with your Dremel or Air Tool. The spot the arrow is pointing to, is a bump in the port that is the bottom of the spring recess. If you grind through here, oil will pour in from the valve cover side, and you will rename your car Old Blue! Turn your head up & down and look at the spring area and the port and see what you are doing. Be VERY careful here!
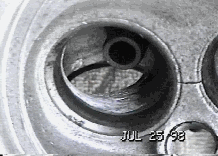
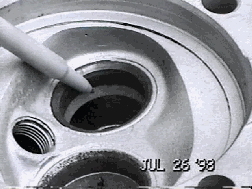
Here the porting has been started in the intake runner. The object here is to straighten out the runner by removing metal from the bottom area in this picture. Blending the valve seat into the runner and straightening the path of the mixture is what you are after. I ended up with a much straighter path between the intake manifold and the valve when I was finished. You get to do this 3 more times!!!, for the other 3 ports.
If you look closely you can see the pen inside the port showing the areas to straighten. Notice how the top of the intake port "above" the pen has been pointed back or "at" the valve. (Blue arrow)
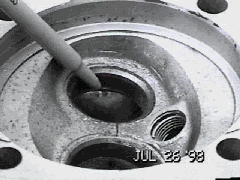
The pen is pointing to the unmatched gasket and the head itself. Notice that the gasket is bigger on the intake ports. Match the head to the gasket with your Dremel, so they are the same diameter, then do the same with your intake manifolds. You will increase your CFM airflow this way into the head. This is a shot of the area you want to remove under the exhaust valve to "point" the exhaust flow towards the exhaust port. This shelf can be removed to just under the actual seat to really improve the flow out of the head. Look at the next shot to see what is removed.
Here is the exhaust runner after the shelf just under the valve seat has been cut back. Leave enough material under the seat however to support it! Notice the difference between this and the shot above. There you have it, some rudimentary but
effective techniques to use to enhance the flow into and out of your dual port
heads. As mentioned previously, this is certainly open for criticism by others,
but I provide it only as a guide. It worked for me, and I was happy with the
results. If you disagree, feel free to write an article showing us what you feel
is a better alternative! |
|
Send mail to
eagleeye@searchmalta.com with
questions or comments about this web site.
|