
![]()
![]()

![]()
|
|
|
|
The Trade Custom Look By Rick Amado Photography: Rick Amado
Nothing completes the look of a custom quite like a chop with a Carson-style top. You can drop it, shave it, and french it, but that’s small change compared to hacking the roof off, chopping the windshield, and building your own padded top. Scott Guildner still builds Carson tops, and even though we’re in a brand-new century, we’ll show you how he built an old-school, padded-chicken-wire top like they did in the ’50s. The best part about the methodology is that it’s simple enough that a patient garage builder like you could probably pull it off in a weekend, not including the trip to the upholsterer. Guildner formed the skeleton and basic shape of the top using electrical conduit and conduit-bending tools available at most hardware stores, built a header panel to rest on top of the windshield frame, then skinned it with wire mesh and sent it off to the upholsterer. He builds each top by hand to flow with the profile of the car, so no two are alike. This isn’t rocket science, but there’s a whole lot of eyeballin’ going on during the buildup of a one-off Carson-style top. Here’s how Guildner does it.
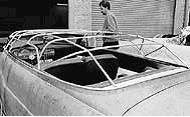
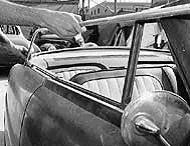
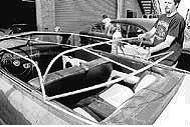
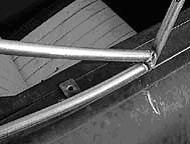
Guildner had a customer who brought him an already-customized Merc and asked him to fabricate a top for it. The car was a four-door that had been converted to a two-holer, at which time the top was removed and the windshield chopped. Using 3/4-inch-diameter electrical conduit, Guildner started at the rear by forming the piece that would go around the back of the passenger compartment. He uses two specific tools to bend the tubing: his trusty pipe bender (to get the shape as close as possible) and his left knee (for fine- tuning). Guildner makes sure to leave the tubing a bit shy of where the top will eventually fall to allow for the thickness of the eventual padding and skinning of the top.
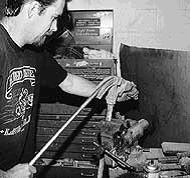
This is a typical hardware store pipe bender clamped in a vise. Guildner used it to make the bend in what will be the new ’side window’ opening. He worked a radius bend that he felt looked good, and then tested it on the car. This angle, which makes up the leading edge of the B-pillar, is purely subjective. One thing you shouldn’t skimp on when building a Carson-style top is just stopping to look at the thing. It’s an aesthetic exercise, so keep looking and working it until it looks right.
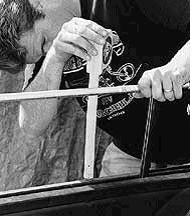
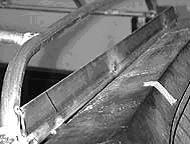
Here’s where Guildner does some actual measuring: at the vertical height of the window opening near the front and again at the back to ensure that the lower edge of the roof (top of the window opening) runs parallel to the door tops.
The side of the car has a slight curve that apexes where the rear of the door meets the jamb, so Guildner slightly curved the top piece to match the contour. With both sides done, he made the next section, which follows the trailing edge of the top of the windshield frame. With all four pieces bent and cut to proper length, he tack-welded them into position. Remember to protect your interior from spatter when tack-welding the pieces together.
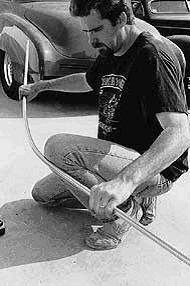
Guildner doesn’t recommend doing any major bending with your knee because you risk kinking the tubing. Here he’s working a little loft into one of the loops that make up the rearward section of the roof. He began with a piece a few feet wider than the roof, and started bending one end (with the pipe bender), test-fitting as he went. Once the shape was pretty close at one end, he found the center (in relation to the car) and marked it on the bar. He made an outline of the bend on the concrete with some chalk, transfering the center mark to concrete as well. By flipping the tube end-for-end and lining it up at the center he was able to form the opposite bend to keep the roof symmetrical.
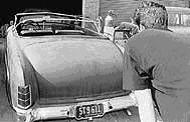
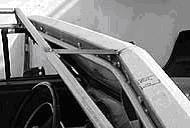
Guildner has enough experience building tops so that he’s confident tacking the loop into place before stepping back. He gets eye-level with the roof and walks around the car to ensure that it has a nice profile. He actually angled this one too high, but since it was only tacked, he was able to pop it loose and reset it at a slightly lower angle.
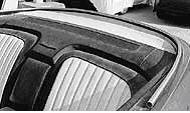
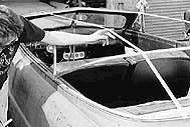
As soon as he had the first loop in place, he ran a strip of masking tape from the windshield back to the rear of the roof. This gives a much better idea of the roofline and helps determine the height and spread of the loops that follow. Now is a good time to do another eye-level walk-around to make sure the roof has the right profile—especially the slope from the top down toward the trunk. If the rear-angled loop looks too upright, take a little off of the ends to move it forward. Don’t be shy with the tape either; if it’s easier to have several strips up, go for it. Just be aware that too many will start to clog up your view. Three or four should be plenty for starters. *
Guildner repeated the steps for the next loop. The shape and angle are obviously different than the previous ones, but the procedure is the same. You can see how the tape comes in handy in determining the loft and height of the loop.
Guildner used his fingers to determine placement of the last two loops. He recommends no fewer than four loops for any given top. The more loops, the more rigid the top will be, but they also add weight.
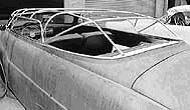
Guildner determined the final height for the last loop and tacked it in place. Now is the last chance to check the proportions of the top, so break out more tape and give it a good long look before proceeding.
Once satisfied with his proportions, Guildner cut longitudinal braces and tacked them between the loops to lock everything in place. He only made two runs, knowing that once the top is finish-welded and upholstered it will be plenty rigid. Remember to leave a space for the rear window.
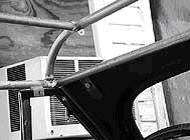
...one on each corner of the windshield frame and one at each rear corner of the top. Guildner used nutserts in the body, which install similar to pop rivets. If you have access to the rear of the panel you could tack-weld a nut to the backside.
Guildner mounted a couple of steel straps across the leading edge of the top as a mounting point for the wooden header panel. He beefed them up with a couple of braces and welded them solid to the leading edge. Remember that you have to remove the top from the car when welding finish beads.
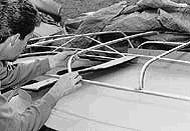
Once the steel straps were welded solid, Guildner drilled eight holes in the strap, spread evenly across the front of the top. He then cut some 2x3-inch lumber to proper length (you’ll use whatever width is appropriate), and attached it to the steel strap with lag bolts. With the top removed, he used a disc grinder to round the corners and leading edges of the wood, creating an eye-pleasing shape that flows with the top of the windshield posts. A trip to the hardware store yielded a couple of rolls of 1/2-inch-square hardware cloth, a crisscross mesh of wire that’s soldered at every intersection. This stuff is much stiffer than regular old chicken or rabbit wire. Guildner laid it across the top and began tying it to the skeleton with baling wire. Every compound curve in the top, like at the rear corners required cutting a slot in the wire and overlapping it so it would follow the contour. Another option is using separate pieces for each panel that has compound curves. At the leading edge of the top, Guildner stapled the mesh into the wood header. Once the wire was installed and all of the ends were twisted and tucked, it was off to the upholstery shop where the outside of the top will have a layer of burlap webbing hog ringed to it, followed by cotton padding, which can be layered to adjust any abnormalities in the top. That’s followed by a layer of 1/2-inch-thick soft foam padding, and finally, the top material of your choice: vinyl, canvas, leopard, and kangaroo—use your imagination. The upholstery shop can also fabricate a rear window opening similar to a convertible top window.
|
Send mail to
eagleeye@searchmalta.com with
questions or comments about this web site.
|