
![]()
![]()

![]()
|
|
|
|
Installation This kit comes complete with all necessary hardware to bolt on a Sand Seal Pulley. No machining of the engine case is required for installation. Before starting the installation, check to make sure that the kit was shipped complete with the following items:
First loosen the alternator/generator pulley nut and remove the fan belt. Then loosen and remove the crankshaft pulley bolt. Using a pulley puller or two long screwdrivers one on each side of the pulley, slowly work the pulley off of the crankshaft and set it aside.
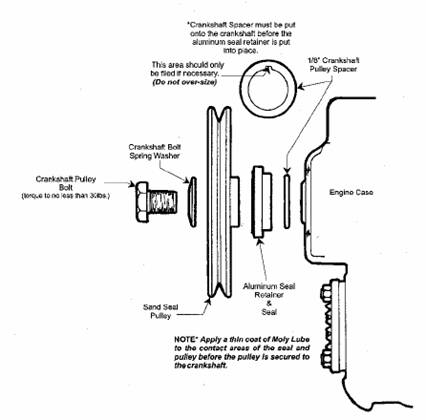
Before sealing the aluminium seal retainer, the 1/8 thick crank pulley spacer must be put onto the crankshaft, before the seal retainer. Sometimes woodruff keys become clinged up and this might prevent the spacer from being put on. In this case, carefully file the sides of the keyway in the spacer so that it slides on smooth. Do not oversize the keyway when filing!
Before installing the Aluminium Seal Retainer, the mating surfaces on the engine case MUST be clean. Wipe away dirt or oil that might have gathered there over a period of time. When the engine case is clean, apply a thin layer of gasgacinch or permalex to both mating surfaces of the retainer and case, then slide the retainer into the case. A slight amount of pressure will most likely be required to get the retainer to mate tight against the engine case. A large 46mm socket or something close to the size of the retainer can be used to drive the retainer tightly against the case. When done, the Aluminium Seal Retainer must be secured tightly against the case.
Before sliding the pulley onto the crank, a thin layer of Moly Lube must be applied to the riding surfaces of both the seal and the pulley. Applying the lube will prevent the seal from being run dry during initial start up of the engine. In such a case where the seal would have been dry, the seal would be damaged and would therefore need to be replaced. The pulleys are machined with an intentional tight fit and should slide onto the crankshaft snug. If the pulley will not completely go on all of the way by hand, tap the centre of the pulley evenly using a normal hammer and a block of wood as a driver. A plastic covered hammer will also do the job. Never use a metal hammer to directly drive the pulley. This will result in severe damage to the pulley. Thread the crank bolt and washer (supplied in with the kit) into the end of the crankshaft. The coned part of the spring washer should be facing the head of the bolt when secure. Torque the bolt to no less than 30lbs.
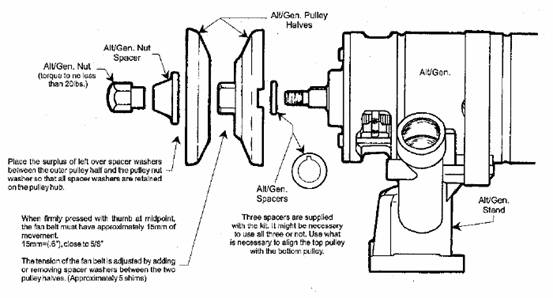
Now loosen the alternator/generator nut and remove the two pulley halves. Three spacers are supplied with the kit for the alternator/generator pulley. It might not be necessary to use al three spacers. The spacers are used to realign the top alternator/generator pulley to the bottom crankshaft pulley, since the bottom pulley has now been moved outwards a 1/8”. Reinstall the fan belt at this time. If the belt shows excessive wear, now is the time to change it. Line the front pulley half up with the hub, slide it on and secure the assembly with the alt/gen. nut and spacer. Torque thee alt/gen nut to no less than 20lbs.
|
|
Send mail to
eagleeye@searchmalta.com with
questions or comments about this web site.
|