
![]()
![]()

![]()
|
|
|
|
Disclaimer: My experience is based on '54, '57, '67 and '68
model years, but other years are very similar. Introduction There are two odometers in the Beetle. One is in the speedometer and the other one is that thing on the hinges to the immediate left of the driver's seat (or to the right, if you are in one of those "other" countries). I have always said that the driver's side door is the best odometer on the Beetle. It doesn't have numbers, but it can't hide years of opening and closing, abuse or accidents very well. Let's just say that a Beetle is 30 years old. If the car was driven all but, say 15, days out of the year, and each day it was driven it made an average of 1.5 trips to somewhere and back, the door would be opened and closed 3 times a day. In a year that would be ((365-15)*3) 1050 times. Lets say that it was driven only for the first 25 of those 30 years. That would be 26250 opens, and 26250 closes. When you think of the mechanical nature of the latches, hinges and handles, (not to mention a window mechanism that has to survive inside) and the forces involved in opening and closing (slamming), it's a wonder that those doors survive as well as they do. This is another article that kind of "blew up" on me, it is quite long. But I did index it to for you, you can just click on the topics below and your browser will jump there. Here's how this article is structured:
Here's the break down of what makes up a Beetle door, and they are all very similar:
I think that is all. The 2 most important things to know about Beetle doors:
OK, confession time. I have in my sordid past, loosened a couple with a big #3 screwdriver, but never all of them. If I ever did loosen one, I stripped the cross pattern out of the other 7 on that side. I have, in the last few years, accepted the religion of going out and BUYING the right tool that I need for the job. They are often not that expensive and you will use them again some day. What you want is a good quality #4 Phillips bit in a 3/8" drive "socket" (I think you can get one for $5 or less, Sears or Home Depot have them). Using this on an air impact wrench is ideal, but a ratchet with a short extension and lots of pressure against the bolt is OK too. FORGET the #3 Phillips (or God forbid, a flat blade) with a pair of vice grips on the shank. You will only strip out the head and then you will NEVER get the bolt out. Use some penetrating oil, and a "hot bit" technique (see the "Tool Techniques" article) if you think you need it, but not too hot or you will damage the paint on the A-pillar. If you do use an air impact wrench, start with a low torque setting and work up. But if you read this too late and/or didn't believe me, you
can drill out the bolts if you have really hosed them up. The shank size of
those bolts is 8mm. This means with an 8mm (almost exactly a 5/16") drill bit,
you can drill right into the head, into what ever mess that you left, and
provided you are centered on the bolt, or close to it, the head will just fall
of once you have drilled past it. But if you attempt this, do not start right
off with a 5/16" bit. Start with a tiny one, like a 1/16" bit. It is far easier
to center (and keep centered while drilling) a very small bit. Once you have
drilled a nice centered guide hole, step up to a bigger bit until you get to the
size you need (use this technique any time you need a precise location of a
hole). Once you get there, you have a couple options. You can switch to about a
6mm (1/4") bit, drill out the "core" of the bolt shank, then use an 8mm tap and
try to re-thread the hole (it is especially important that the hole be perfectly
centered if you do this). But probably the easiest is to find a donor car and
steal the bolts and the threaded plate from it to use in your car. Yes, those
bolts thread into a separate plate that can be easily removed once the door is
free. There are little tabs that hold the threaded plate captive that can be
bent back to release the plate. The one at the bottom is bit tough to get to,
but it can be done. Major Door Changes Over the Years These are the major year changes involving the doors that I can think of: 1947: These doors had no vent windows. The "original" on piece glass. 1950: Still one piece glass but with "notch" cut at forward upper edge to allow ventilation when only slightly open. 1952: Door window crank ratio changed now 3.5 turns to raise/lower completely from 10.5 turns. "Semi-gear/clock spring" type window regulator. 1953: Lock button added to door vent windows. 1955-ish: Nut and spring on the bottom of the vent window pivot inside door replaced with 2 piece clamp. 1960: Door handles become grab handles with push buttons, formerly pull-out lever type. 1965: Vertical window opening enlarged, slimmer door and windshield posts. New "spiral snake" type window regulators (2 point lift) 1967: Round push buttons on door handles replace rectangular ones (one year only door handle), locking buttons on doors replace lever action locking. 1968: "Trigger" type door handles, splined shaft on window regulator changed slightly 1970: "Spiral snake" type window
regulator simplified (single point lift) Removing the door panel In my college days I spent several years working as a car
stereo installer. This formulated my way of thinking about taking car interiors
apart and helped out a lot. To remove the door panel, first remove the window
crank. There are two ways that I know of that these are held on. Pre about '67 I think, the crank is held on to the splined shaft with a small "punch pin" about 1/8" in diameter. You need something to drive this pin out. Ideally a thin punch, but less ideal is a long thin nail with a blunted point. Push the door panel behind the crank back to expose the pin. The early ones had a little circular plastic trim piece "bushing" (for lack of a better term) between the crank and the panel. Usually I wedge a screwdriver between the handle collar and the plastic ring to hold the panel back while I tap the pin out. With the panel pushed back, you should be able to see the pin when you rotate the crank. Drive this pin out with your nail or whatever and a small hammer. The pin will come out from either side. Don't loose it, the handle will now come off as will the bushing piece. Do not (try to) take off the arm rest. The door release handle on the
early ones also has a pin, same technique for removal. Late models'67 and later (although I never had anything newer than a '68) models, the crank is held on by a Phillips head screw in it's center. You need to pry off the black plastic covering over the handle to expose it. Use a small screwdriver on the backside of the center handle "circle" opposite the crank arm, that's where the little tab is that holds it on. Take out the screw and handle. There may be a trim "bushing" on some models. One the door release, you need to
remove the little metal chrome or black "frame" around the handle. It is also
held in place by a single Phillips head screw. To get access, hold the handle
out and pry out the black plastic "cup" from inside the frame. Pry it up at it's
little tabbed end under the handle hinge end, now you can see the screw. Take
out the screw and handle frame. The actual handle stays on the door for panel
removal. All modelsThe panel is held to the door by little "snaps" all around it's perimeter. Get a big flat screwdriver or a stiff putty knife and start prying around the panel between it and the door. If you are concerned about the paint around the inside of the door, insert a piece of cardboard between the prying tool and the painted door to prevent scratching; OR wrap some masking/electrical tape around the lower shank of the screwdriver. If you are REALLY concerned about your door paint, border the whole panel with heavy masking or duct tape on the painted metal part. Pry slowly and be patient. You will hear a confirming "pop" every time a snap pops out. Take you time and go all the way around. Now here is the (somewhat) tricky part. The panel "hooks" onto the door via a metal bracket behind the armrest and a shallow "hook" on the door metal inside. The panel must be lifted up about 2" before it will come off. Again, if you have really nice paint on the inside of your door (around the edges, the part you can see with the panel on) that you absolutely don't want to scratch, get some 2" or so wide masking tape and put a couple layers along the painted surface along the top of the panel. Otherwise you may scratch this paint with the snaps on the back of the upper edge of the panel when you pull it up. Now, put a hand on the top center of the panel and one on the bottom center and "bow" the panel from the top and bottom a little and pull it up. It should come right off. If you bow it right and go straight up you shouldn't scratch anything. [Trivia] '57 and earlier Sedans only had an armrest on
the passenger side. What's Inside? Now you should be looking at a plastic sheet glued to the inside of your door, with a few holes in it for the window crank shaft, etc. (if you are not, your door has been messed with, and/or you have a very old VW). If there is no plastic or it is all shredded, put "plastic sheeting" on your list of stuff to buy before you put everything back together again. The sheeting serves a couple of important purposes (see "re-assembly"). Pull this plastic off. You will likely rip it all apart, but get it all off. Some of the newer adhesives that VW used let go pretty easily. Next, remove the window regulator. I know of 4 basic types:
Removal of the regulator is pretty straightforward, 10 mm bolts all around the inside of the door facing you, none are "hiding". (I'm not staring at a door as I write this, so I 'm going from memory.) You should remove the window from the regulator first, then remove the regulator. To do this, lower your window. You should see a metal "U" shaped "sash" that is holding the lower edge of your window. This is sometimes called a "lift channel". On the '65 and later regulators, this sash is attached to the regulator (10 mm bolts) via pivoting brackets attached to the sash . Remove those to free the window from the regulator. This sash is different between the '52-'64, '65-'68 and '69 and up doors. On the earlier ('64 and older, semi-gear) regulators, the end of the gear arm has a pivot with a head (like a really fat nail head) that slides in a channel attached to the under side of the sash. With the regulator removed (unbolted from the door shell) you should be able to pull the regulator toward the front of the car and free it from the window sash. With either regulator, be careful, as the window glass may drop down forcefully when the regulator is unbolted. I do remember removing the lower bolts holding the regulator ('65 and newer ones) and pulling it out a bit and then being able to wiggle the window out of the inside of the door but is really easiest just to take out the whole reg. Just support the window in the "up" position with some pieces of wood while you do this. Once you get all the bolts out, push the window crank shaft back into the door and the reg. can be dropped down and out. Once you have the reg. out, you can let the window all the
way down and out, with its metal "sash" still attached to the bottom edge. Take
your time, be patient. You may have to some twisting and turning. You might
loosen the bolts or screws securing the lower part of the forward and rear
guides to make getting the glass out easier. Removing/replacing the glass Ok, while we're here, lets talk about how the glass is held in. (If you jumped here, we're talking about the "main" glass, not the vent window glass. Stay with the rest of the class) This is a scary area for many people as horror stories about breakage and special tools and setups surround it. Relax. It is easier than you would ever believe. All you need to replace the glass from the sash is a block of wood (about a 5" section of 2 by 4 works great), a medium sized rubber mallet and some masking tape. At this point, you should have your glass out, with the sash on it. Or, you have just the sash and lots of broken pieces of glass. Before you remove the sash from any good glass, you want to mark the sash position along the lower edge of the glass so you can get the new piece in right. If you have only busted up pieces, you will need to take the panel off of your other door and make this measurement. Have glass? Put a piece of masking tape around the lower edge of the glass right next to the edge of the sash. If a bit of the rubber gasket sticks out past the end of the metal sash, trim it off with a razor first. Now lay the glass on some flat surface with the sashed end just over the edge. You might want to lay a towel down first, as a dirty, gritty surface will scratch the glass laminate. Lay the block of wood on the glass, with it's long edge resting on the metal sash lip. Now whack the block with the rubber mallet (remember, I said a rubber mallet). Work from one end of the sash to the other a bit at a time, you should see it start coming off. No need to flip the glass over. To put the glass back in a sash, clean it out first. Actually, inspect it closely. They notoriously rust out along the bottom (and subsequently loose their "grip" on the glass). I have brazed a few of them back up, new ones for the "2 point" regulators are getting a bit scarce, if you have a good one, keep it. You should use a new rubber gasket, unless the one you took out is really nice (clean it with soap and water). They are still available, and sometimes you can buy sheet rubber of the same thickness that will work just fine. I usually tape the gasket on the lower edge of the glass on both sides (in the right position! that's why you marked it when you took it off) just to hold it there while I start the sash on. Put a little light soapy water on the gasket/sash to help, stand the glass on its top edge on the towel, position the sash over the gasket and tap it down with the mallet. It goes right on, no pounding is needed. Cake, right?? By the way, there is no "left" or "right" side window glass in the Beetle doors. The glass is perfectly flat and it can be used on either side. The only way it "should" be if you are picky, is that the majority of the text (on original windows) in the glass should be readable from outside the car (some vendors will list a "left" and a "right", others will not). The door glass is the same from '52 to '64, and '65-'79. And about those vent windows, well they are a little
tougher. I have hammered the frames off of them with a block of wood and a
mallet too, but it is tougher. I have also pulled the glass out of a few frames
with just my bare hands (and leapt tall buildings with a single bound too). To
press new glass in the right way, you need to make jig by cutting piece of 3/4"
ply wood in the contour of the vent frame and nailing that to another flat piece
of wood. You use that as a "back stop" for the empty frame and use another piece
of wood and a couple wood worker's pipe clamps to press the new glass in. I just
did this with my '57's windows and lucky for you, there are pics and all the
details on
Page 15 of my '57 restoration series. Removal of the Vent "Wing" Window Even if you didn't want to, this step requires removal of the stuff mentioned above. Pry the felt channel out of it's groove in the upper window opening, starting where it meets the vent window post (the thing that separates the vent window from the main window). It is held in buy little "toothed" clips. If you are disassembling the whole door, pull the whole channel all the way out now, following it down the back edge of the door. It goes about halfway down inside. Now, follow the vent window frame post down inside the door. On the inside of the door you will see a 10mm bolt or two holding it at the bottom (the '65 and laters it's just one bolt about 5" below the sill, on the early doors, it is 2 bolts farther down). You may have already removed them it thinking that it held your regulator in place, if not remove them now. Now, look up inside the upper door groove, where you started pulling the felt channel out, you will see a Phillips head screw (some have 2) holding the upper part of the vertical frame bar to the door groove. Take it (them) out. Be careful with these, most all of the screws I have encountered here in probably a dozen doors are corroded into their holes. Spray some penetrating oil, make sure you have the proper size screwdriver, go slow. '65 and up... Now open the vent window and, with the palm of your hand, hit the vertical frame bar from inside the vent opening toward the back of the door. It should loosen the whole vent window frame, seals and all, from the door. Lean it back, tilt it toward the outside of the door and pull it up and out. '64 and older... The vent window frame post should be removable now by leaning it out and pulling it up. The vent window stays in, the separator bar is a separate piece. Next, peel the thick vent window seal away from the door at the front, it is just interference fitted into a "C" channel in the frame. You should expose another bracket that holds the upper vent window pivot to the door. If you will be replacing this thick seal, go ahead and snip it where it goes around the upper pivot and remove it all together. If you will re-use it, you will have to roll it back to see the screws. Remove the screws holding this in. Make sure the 10mm bolt that is holding the lower pivot to the inside of the door is removed. Now reach up inside the door. On
the early Ovals (my '54 had these), there is a nut on the end of the lower vent
window pivot rod that must be removed before the vent window can be removed. It
holds the pivot in the bracket and has a short, thick spring on it. A socket
(14mm I think) on a long extension can reach this nut. Once it is off, the
spring and the bracket will fall down. On the later years up to '64, there are
two 10mm bolt heads just below the frame pivot on the inside shell of the door.
These hold a "clamshell" clamp on the frame pivot. Reach up in there, remove the
bolts and then the clamp. Then the vent window, and frame can be removed from
the top of the door. The Scrapers and Felt Channels The felt channel goes from the upper edge of the window opening at the top of the vent window frame down along the back edge into the inside of the rear of the door, you might have removed it already. There is also another felt channel in the separator bar, it is replaceable. These are the guides for the window as it goes up and down. The longer one is held in place by several little "U" clips along its path in the later doors. It can just be pulled out of these, but if it is particularly old, it may be very brittle and crack if you bend it too much. So if you intend to re-use it, be gentle. Once it is out, the "U" clips can be removed by sliding them along the channel area a bit. They have little "tabs" that slip into holes in the door and the channel guide inside. Look close, you'll see, it's pretty obvious. The early doors had no clips, the channel was held in place by an interference fit and maybe some glue. The scrapers are those rubber lips that your window slips between as you roll it up or down. This is probably the first rubber seal to deteriorate in the car as it is pushed in and pulled and you rest you arm on it a lot in the summer. And yes, that chrome molding on the outside scraper is attached to it. These scrapers, both inside and outside are held in place by metal snaps that go into holes in the rolled edge of the door sill. You must at least remove the window from the regulator and lower it down into the door to remove the scrapers. Taking the window out is best. Many people ask if they can replace the scrapers with out unbolting the window and dropping it (with it between the scrapers); the answer is no. To remove the scraper snaps, a metal blade putty knife works best, about a 1-1 1/4" wide blade. A plastic putty knife blade might be even better if you are concerned about paint. You can slip this between the scraper and the door sill and exert enough pressure to pop the snaps out. You have to "feel" for the spaces between the snaps. A screwdriver will distort the metal band and molding on the scraper almost as soon as you try to wedge it down behind the scraper, and will be more likely to scratch paint on the door. The chrome (or aluminum) molding that goes up and over the door opening is held captive by the felt channel. In later doors it is held by the "U" clips, in the earlier doors there may be small sheetmetal screws holding under the felt channel. Look closely. The later model scrapers are held in by "band" type snaps, the early ones by a wire formed, continuous snap wire. The procedure for removal is the same for both. Scrapers for the '65-'78 model years are quite expensive
(yes, the older ones are cheaper), make sure you know what you are
putting back in there, what you are paying for it and where you are going to get
it before you go destroying the old ones getting them out. OK, you should have already have taken the inside release handles off. To get the outside handle off, pull the door weather stripping out of its groove just where it passes by the handle area. You should see two Phillips head screws there, take them out. Now give the handle a little bump with the palm of your hand toward the hinges. It should move about 1/4" and then you should be able to pull it out. Now the stuff left inside varies quite a bit across the
wide range of years, so I won't get too specific. Remove any 10mm bolt heads
that you can see that you haven't already. Remove any Phillips head screws that
you can see on the back edge of the door around the latch. Remove the inside
lock button, if you have one, by unscrewing it. With all of these removed, the
latching mechanism will come out. You may have to push and pull, wiggle and
wangle, but it will come out. Be patient, don't bend anything. The Door Check Rod This is the rod in the front edge of the door that pivots
off of the A-Pillar and keeps the door from flying open too far. It is held in
it's pivot by a small pin. In the bottom of the pin is a tiny spring "C" clip
that can be pried off with a very small screwdriver. It is VERY small and easy
to loose, go slow and keep as many fingers on it as possible (Worried about
loosing it after you have it out? Get a big fat, wide piece of masking tape, and
sandwich it in the tape folded over sticky side to sticky side. Then write on
the outside of the tape with a marker "Door check rod pin clip". Good tip for
any small parts). Once you have removed the pin, the rod can be pushed back
inside the door and removed. Door Seal If you haven't pulled it off already, remove it now. It is
usually glued in there. If you have to scrape, use a sharpened popsicle stick so
you won't scratch paint. Door "Resto"- Fixing Stuff Ok, so now you have all of your door "guts" out all over the driveway, and a bare, empty door shell right? The first reconstructive step of the total door resto is to fix/resto the mechanical stuff while it is out. Primarily the window regulator mech and the release mechanism. It should be obvious how these mechanisms work, and if they don't, why. A window mechanism needs to be well lubricated. In doors with poor or nonexistent "scraper" seals, lots of water runs down through the doors and can bring lots of crap in with it. You should not expect a 30 year old window regulator to be smooth and loose. I use a general white lithium, water resistant grease for just about everything. The "spiral snake" regulators can be cleaned up with your favorite solvent, and re-greased. I don't have one in front of me right now, but I seem to remember that the end of the regulator "tube" is just crimped to prevent the spiral from being cranked out all the way. You can just flatten out the crimp and then you will be able to remove the whole "snake". Clean everything up with solvent, re-grease well and put the crimp back when you are done with a pair of pliers. Regulators with stripped, broken or wobbly winder shafts may need to be replaced altogether. Same for the latching mechanisms. Clean them up and re-grease the moving parts. I use a can of carb or brake cleaner to clean stuff like this, you can shoot it all inside stuff without having to take it all apart. The pivots for the vent windows are notorious for getting either sticky and creaky, or too loose so they flop back around when you open them at speed. There are several types, but they all work on the same principal. Controlled friction on the pivot end inside the door. With that vent assembly out, you will be able to address this. Get out your WD-40, clean, wire brush and adjust until you get the results that you are looking for. Earlier ones used a short, fat spring and nut to keep pressure on the pivot, later ones used a clamping "clam shell" type of deal on the pivot. Lastly and worth a mention, those early ('66 and earlier)
window winder handles are notorious for freezing up at the knobs, especially if
unused. I have had excellent results freeing them with some penetrating oil and
some patient muscle action. If the chrome on the handle is good, they are worth
keeping. And while I have no firsthand experience, word is that the aftermarket
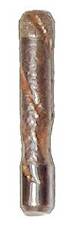
one's knobs fall off after a few months of use. About those hinges. They actually hold up pretty well, but many either get too tight, or loose and floppy. Usually the passenger side hinges are the ones that can get real sticky, especially if that door is not used much. But they can be fixed. To check to see if you have excessive hinge slop, open the door just about 3" at the back edge, grab the outside handle firmly and lift up firmly. Look at the lower hinge when you do this. Lift up and let go repeatedly, if you have pin slop, you should see it here. Watch the upper hinge too, but usually it is the lower one that develops slop first. Now open the door all the way and do it again. If you see any movement at all, the pin is badly worn (mildly worn ones won't show any play) and you may have trouble getting your door to close and align perfectly. I have had some success working these hinges loose with lots of penetrating oil and elbow and shoulder work (working it back and forth with a pair of vice grips on a door off the car). I have had much better luck heating the hinge with a torch, in the pin area. This is only recommended if you will be painting the car. And not glowing metal hot either. Just enough to give you a bad burn and smoke the WD-40 when you spray it on there too. Jarring the hinge with an air chisel/impact hammer with a blunt bit can help too, but don't go whacking it with a hammer, you will just bend up the area. Heat oil and patience have the best records. Beyond that, pin replacement is warranted. Many parts suppliers sell replacement pins in either standard or oversized sizes. Now I have had some rather unpleasant experiences trying to drive hinge pins out. It wasn't until very recently, when I was in no particular hurry and had a "spare", almost junk door to practice on, that I was successful driving a pin out. In all honesty, I must also add that since the last unpleasant effort, I had learned that the pins are driven up, not down. I had decided to replace both upper hinge pins in my 57's doors prior to final paint not because they were floppy (they were perfect by some miracle), but to add two, similar rearview mirror mount pins. Prior to 1968, the rearview mirrors were mounted on the upper hinge pins on one or both doors. The "mirror pin" has a threaded shaft that sticks up above the hinge top to allow fastening of the mirror. I always found this particularly interesting because in the 50s and early 60s, Beetles shipped to the US had no outside rearview mirrors, they were a dealer installed option. This meant that dealers had to have the facilities to drive out the "plain" pins and replace them with the mirror versions. The dealers had a special tool that wasn't an impact hammer, but rather resembled a short length of pipe, capped off at both ends. A wide slot went end to end on one side of the tool, it was placed over the protruding hinge and big bolt, threaded into the bottom "cap" was then turned to drive the pin up and out. Word is that these tools have gone the way of the T-Rex. But the easiest way to drive pins out is with a pneumatic impact hammer and a punch bit. I had one of these tools from a cheap department store set, but made a point of buying a good quality Ingersoll-Rand hammer prior to attempting the pins on my '57's doors. After getting a few "trash pile" doors one day, I decided to try out my new hammer. To my amazement, the pins floated out with almost no pressure on the tool. I am convinced that an air impact hammer is the way to do this. Below are some pictures from my escapades with the hammer....
This is the pin I drove out of the extra door, it was an early 70s door. Notice: The top of the pin is knurled (thin vertical grooves), it is actually the part that holds the pin in place in the hinge.
Look how badly the pin has eroded away. This hinge was quite floppy.
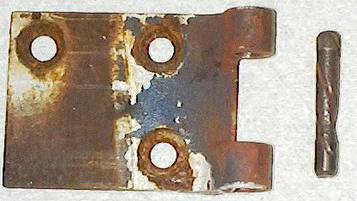
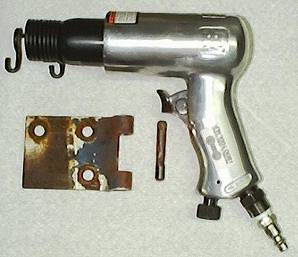
Here you can see the outer hinge plate; it is the upper hinge from a right side door. You can also see how the pin is quite a bit shorter than the height of the hinge plate, allowing the pin to be driven down and recessed into the hinge bore. There are actually little plastic plugs that go in the holes on top of the hinge to keep the oil in and the water and gunk out. Does your VW have them??? West Coast Metric sells replacements. Can you see why they are important? How little dirt and scum it takes to fill up that tiny groove if those hinge plugs are not in place! Keep you plugs in place, pop them off and put a few drops of oil in each year and your hinge pins won't end up looking like this one... And while you can install the pins upside down (knurled end down), hopefully you can see how disastrous that would be, as you wouldn't be able to oil them! Here's my "Big Gun", this is a serious tool. For a bit, I sawed off the end of a cheapy chisel bit and MIG'ed a length of 1/4" bolt shank. If you do this, by a very high grade (grade 8 or better) bolt. Otherwise the end mushrooms out pretty fast.
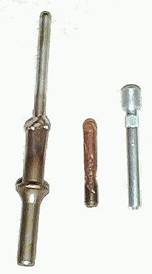
I know this picture is fuzzy, but I wanted to show you the early "mirror" hinge pin. Notice how it is taller than the old one as the threaded head must sit flush on top of the hinge plate. These pins are used on the '67 and earlier Beetles where the outside rearview mirrors sat up on the tops of the hinges. Also notice that it does not have the oil groove. I may try something clever like drilling a small hole down the center and then out to a groove that I will cut. In this pin, the mirror mounting nut would act as a cover for the oiling hole. On the left is my homemade "pin bit" for the impact hammer. When oversize pins are used, the hinge bores in both the outer plate and the plate attached to the door must be reamed out. Many vendors sell the reamer with the oversize pin. You cannot just use a drill bit and a drill. A reamer is needed to bore out the hinge plates and keep the bores true. Check with the vintage suppliers on my "Links" page for the repair kits, and advice, if you think you want to try this. Keep in mind that in common year Beetles, you could just go
looking for another door. Getting it to close right (door alignment) A perfectly closing door is a thing of beauty. And if you are getting ready to paint your car, trust me, you don't want to be dooing this kind of thing in fresh paint. Now let''s assume that your hinges are perfect, have just been re-pinned, or you are going to live with them the way they are. But keep in mind that if you have hinge play, you may never get your door to close and align perfectly. If you have already gutted your door, this is a good time to do this procedure. The door to body seal out, you will have to remove the check rod if you don't want to destroy the seal. Take the striker plate off the B pillar, and the latch out of the door. If you have perfect paint in the door and door opening that you don't want to even take a chance of nicking (like if you just got the thing back from the body shop and unfortunately have waited until now to address the door alignment), put a couple layers of wide maskig tape along the outder lip of the door, the one that holds the seal in. Press it down all the way, you want it to lay flat and not interfere; you may be closing the door much farther than you would be able to if the seal were in place. Now the idea is to get the door in perfect alignment before you put the latch and seal in. Those two things can have an effect on how the door closes and you want to get the door itself right first. Close the door and observe how it fits in the opening. Vertical alignment Look at the body "waistline" crease as it goes across the
rear quarter panel and the door, and see if it aligns. Door "Resto"- Putting it all back together The Drain Holes First, and probably most important, clear out the drain
holes at the bottom of the door shell. This is probably the most important
thing that you can do for your door. If there is rust there, treat it (see the
"rust" article). Even with the newest and tightest of seals (scrapers), water
does run through your door in heavy rain. It is designed for that. It should
be no mystery that if the water can drain out of the bottom, it will sit in
there and start rust. If you cant see the drain holes from above, inside the
door, look underneath. They are small, there are usually 2 or 3, and they are
formed between the "skin" panel and the "frame" panels of metal. Paint Anyone? Hopefully, it goes without saying, that if you have ever
entertained the idea of painting your doors, either inside, outside, or both,
now would be a good time to do that. I have had good success painting interior
metal with a good quality spray paint, but don't shun auto paint if you have
that as an option. Particularly, the window "sill" area next to the scrapers,
both inside and outside, should be considered. And it is far easier to paint the
inside of the door (the metal area that surrounds the door panel) while it is
off the car and all take apart. Make sure you prep and paint the underside well
too. Sound Deadening Ok, so you got all of the mechanical stuff cleaned up and working smooth. Time to put it all back together. This is where patience and some attention to detail will really pay off. First, look at the backside of the door skin. There probably is something glued in there. All of the stock doors I have seen has a black, tar/fiber mat glued on there. Roughly 18x20 inches or in the early Beetles, a couple of wide strips in an "X" pattern. If this is worn and tattered, peeling away or especially if there are hints of rust around it (happens when water drips behind the mat, between it and the door skin), remove it. Treat the rust that is there (see the "Rust" article). Now you should replace it with something. Without anything there, your door will have a very hollow sound when you close it, interior road noise will be increased, and if you put/have speakers in your doors, they will have a "boomier" sound. I have a couple of recommendations. One is some stuff that the car audio freaks use called "DynaMat". It is a vibration and sound absorbing material. It works very well. It has an adhesive backing and is easy to put in. But it is very expensive. A couple pieces for both doors will cost you $30-$40 or more. Parts Express (www.partsexpress.com) sells a Dynamat "knock off" stuff that is priced pretty reasonably. I have heard decent stuff about it but have no firsthand experience. Another recommendation is carpet padding. Go find a really heavy foam padding, 3/8"-1/2" thick. I have found it at Home Depot. $30 there will get you enough do your doors, rear panels, and the living room in your house. The stuff is really cheap, about $6-$7 a sq. yard. There is less expensive foam padding (usually that multicolored stuff), but it doesn't work very well. I would use rolled roofing (see below) before I used that stuff. Usually you have to buy it in the length of the roll (either 6 or 12 ft). Just measure your shortest distance and get that much off the roll (1 sq. yd.= 9 sq. ft. = 1296 sq. in.). Use the 3M "Super 90" glue (available at Home Depot now in a spray can, you should have a can of this glue, it is indespensible for auto work) to attach the padding to the inside of the door. The "jute" or fiber carpet padding (usually gray) will work somewhat, but doesn't hold up well to moisture (it absorbs it). I might use it in a car that would only see the cleanest or sunniest of days. And keep in mind that water will run through this door if it is driven in the rain, even if you replace the scraper seals. Anything you you glue to the inside of the door will get wet, and something that hold moisture (the jute does) is not optimal. If this is a car that will be a daily driver and see lots of wet weather, the Dynamat stuff or rolled roofing might be the best option. Lastly, there is rolled roofing. Rolled roofing is basically like one huge shingle rolled up. It comes in various types and usually is about 3 feet wide. The type you want to look for is "smooth" roofing, this means that it doesn't have any of that "gravel" or "grit" on it. This stuff is actually very close to what was in there originally. Don't confuse this with "tar paper" that is used under shingles. Tar paper is much thinner. Rolled roofing is usually about 1/16"-3/16" thick. You may be forced to buy a whole roll of it though, but it usually is pretty inexpensive. You can cut it with tin snips, a razor knife or just good pair of utility scissors. And actually, this same stuff is a good "tar mat"
replacement too. This is the stuff that is glued over the tunnel on the pan,
under the rubber mat or carpet in some years. It can be (the "smooth" stuff,
without grit/gravel) a bit hard to find. Call all of the roofing supply
places that you can. Put the Mechanical Stuff Back No big secrets here, just take your time. It can go back in; sometimes it is a bit tricky. When I took my '57's door apart, I made a list of the order I took stuff off, and used that when (some 6 years later) I re-assembled them. Here's the list (to re-assemble):
Now that is the way I did it, and this was for a '57 door and some minor details may be missing. Doesn't mean that everything has to go in this order, but most does (For example, I had to de-install my door check rod to put my new door seal in) Make sure all of those 10mm bolts have washers and are snugged down tight. In general, put stuff back in the same order that you took it out, usually the latching mechanism goes in first, then the vent window. You can then put the window reg. in, but only to the extent that you had it in when you dropped the window glass out; you may have to leave a few bolts out until you have it (the glass) back in. No real tricks here, just feed it up from below, making sure that it is in the felt channels front and back. It should slip up there pretty freely. Once you get it attached to the reg., you can bolt up what ever is loose on the regulator. Then, find the window crank and slip it on the shaft and try the window mech. Make sure it goes up and down to your satisfaction. If it doesn't, make what ever adjustments that are needed NOW, while it is all accessible. (see "Common Problems", below) Another trick I remember was that with the "snake" type regs ('65 and later) as you pushed it up inside the door, you had to make sure that the top curve of the regulator (above the crank spindle) went into the inner (inside the car side) lip formed by the window sill. It has a tendency to want to slip up into the opening between the sill, and of course later you will find that you can't get your window in. The whole reg must reside on the inside (inside the car) panel of the door so the window can move up and down. (hope that makes sense, do it and I think you will see what I mean) On the early regulators ('64 and earlier), get the main
glass up in the guides and push it up part way. To assist this, loosen the
bottoms of both channel guides. Then, slip the end of the regulator (the little
"wheel" thingy) into a well greased channel at the bottom of the window and then
bolt the regulator up. Scrapers and Vent Window Seals Now, if you are putting new scrapers in, you will want to make sure that the area that they butt up against is nice and rust free. Take the time to sand, prime and paint this area if needed (the inside facing areas of the window "sill"). New scrapers, with that aluminum/chrome molding attached are readily available, but the outside ones for some years can be quite pricey. Before you snap what ever your using back in, you might want to consider a thin layer of silicone between the seal and the door. This will prevent water from leaking down in between and potentially starting rust in the sill, and it will help the seal stay put and avoid rattling. The downside is that it will make removing the scraper again in the future a bit more difficult. You decide based on whether or not you will ever take them out again. And if you care about the paint on your sills, tape it heavily along the exposed painted part when putting the scrapers in. The outside scrapers especially have a passion for scraping up the sill paint. Once you get the snaps below the sill level and started in their holes (but not snapped in), remove the tape. Otherwise it may be pinched between the molding and the door and difficult to remove when you are done. On my '57, the inner seals were held in place by a continuous wireform snap, pretty harmless to the paint. On the other hand, they were a bit weak too and that seal seemed to benefit most from some silicone between the seal and door before snapping in place. The big fat vent window seal on my '57s doors was a bit of challenge, don't do this unless you have ample patience. I was able to work it in from the outside by forcing its inner "bulge" down into the "C" channel in the door frame with a standard flat bladed screwdriver while holding the outer lip up. I had to peel it back real hard to get the two screws in that held the upper pivot bracket (with the vent window wide open). Getting it all tucked in around the lower pivot was a bit tough too. And I discovered that a slit needed in the seal for the locking lever "catch" (screwed into the door frame before you install this seal) was not there, I had to cut it myself with a razor. But when it was all done, that nice fat black rubber seal sure made the car look new. I don't remember if my original outside scrapers (moldings) had screws in them or not along the upper part, inside the door frame channel. There were some holes in the door frame, but no holes in my new scrapers from Wolfsburg West. I ended up drilling the scraper molding out in a few places and using a very small sheet metal screw to insure that the molding was held snug in the frame and followed the contour of the window opening nicely. Lastly, the seal on the separator bar (earlies) can easily be installed last. It may need to be trimmed with sharp wire cutters at the top to match the contour of the felt channel and main vent window seal.
The Sealing Now whether or not you actually had some when you took your car apart, you must put a plastic liner in your door before putting the panel back on. You do this to seal out wind, cold and moisture. If you don't do this, the back side of you panel will invariably get wet and warp and crumble. If the panel you took off was all rotted and warped at the bottom, it is probably because the liner was torn, improperly installed or missing altogether. At this point, you should have your sound deadening, release mechanism, vent widow and regulator and glass (working to your satisfaction) installed. You can buy this plastic sheeting at most hardware/department stores. You want a decent thickness, 4-6 mils comes to my mind right now. You want to cut a piece the exact width of your door panel and a couple inches taller (top to bottom). Then round the top corners to match the curve on the door panel and 3" up from the bottom, on either side, cut a perpendicular slit in the edge about 2" deep. Use the 3M Super 90 glue a disposable paintbrush (I spray glue into a paper cup from the can for this) to apply glue to the sides and top of the door in the area ("ledge") that the door panel snaps into, don't do the bottom. Then apply glue to the back of the plastic that you cut, up the sides from the slits you made at the bottom and around the top. Let the glue dry. Once it has dried, carefully stick it up to the inside of the door starting at the top first. If your door has, or will use, those snap seal "cups", remove them first. You will temporarily cover up the holes that the door panel snaps go into, the inside release handle and the window crank shaft. At the bottom, where you cut the slits, you want to put the plastic inside the lip ("ledge") that the door panel snaps to. Think about it, you want to keep water off the panel, but it does drip through the door, so at the bottom, you want to tuck it in to make sure that the water is channeled to the bottom of the door where the drain holes are (you cleared them, right?). So there will be no plastic between the door panel and the metal door along the bottom edge. Now if you are putting (or already have) speakers in your doors, you will have to get creative. If the speaker is very shallow, you might be OK doing nothing. But if it is a "deep" speaker, you may have to cut and opening in the plastic and glue a much bigger piece of plastic behind it to make a "curtain" to keep water off you speakers. Some speakers meant for doors come with semicircle "drip guards" to protect the speaker from water. If you make an opening, make sure that whatever additional plastic that you glue behind it goes well below the opening that you cut, even if you use "drip guards". Otherwise, water could "follow" the liner down and trickle in, missing the speaker, but wetting the panel. And since we're talking about seals, let's do that door seal now. That would be the big one that goes all the way around the door. You may have to scrape the old one out, but be careful not to scratch paint. A popsicle stick with a sanded, square edge is a good safe way. Make sure you get all of the old rubber out. If you hadn't removed, or installed already the door check rod, you'll have to pull it off again to put a new door seal in. You may have found widely varying prices on door seals. As cheap as $10 a pair for some Brazilian/Mexican stuff to close to $100 for German NOS. Generally, you get what you pay for. The top quality (top dollar) ones are very nice and last much longer than the less expensive ones. But I look at it this way: If a better product costs 8-10 times more than a less expensive one but only lasts 4-5 times as long AND the less expensive one lasts an acceptable amount of time AND the product is easy to replace, I still have to seriously consider the less expensive alternative. I think this is very true for these seals. Yeah, that original German rubber is nice (I did buy them for my '57), but popping for $10 a pair every 2-3 years is no big deal, and it will take a LONG time before I get up to $100. You decide, the cheap Brazilian ones do fit and work OK, they just don't hold up well in the long run. Simply brush a little contact cement in the groove around
the door, especially along the back edge and near the latch area where it curves
outward, and push the new seal in. Work your way around and make sure it is all
the way in. Dressing Up Ok, we're on the home stretch now. You need to slit the plastic liner over the window crank shaft, and the release handle. The less you cut the better, I usually just make a small "X" on the shaft and a slightly bigger, wider one over the release handle (for the newer '67 and up style). Originally, the doors had little rubber "cups" that went into the holes under the panel edge, to accept the panel snaps. The panel stays in fine without them, but they help reduce rattles and squeaks. If you are using those, put them in now. Just puncture the liner over the holes with a nail or something and push the cups in. If you have the newer style that didn't use the cups, you don't need to do anything, the snaps will puncture the plastic when you put the panel on. Make sure that all the snaps are in place in the panel. You can get extra snaps (and rubber cups) from the vintage suppliers on my "links" page, or next time you go yardin', get a pocketful. The snaps should "point" toward the outside edge of the door panel in the little holes that they are in. They don't have to be perfectly aligned, you can slip them around after you fit the panel up. Now remember how you took the panel off by bowing it? You have to do the same thing to put it back on. And it is REAL easy to scratch a freshly painted door interior with the snaps when putting it back on. Most susceptible is the upper part as you have to start with the panel "high" and then slide it down. So a real good idea is to put 3-4 layers of wide masking tape over that metal area just above the panel on the inside, and it ain't a bad idea to go down the sides either. But make sure you paint is completely dry if you do this. If you just sprayed 3 coats of Krylon a few hours ago, you will pull paint off trying to take the tape off. Play it safe and wait a day after painting, just drive the car, if you have to, without door panels. So grab the panel midway at the top and bottom and put a good bow in it. Look down from the top or from the side and slide it down so that the metal bracket behind the armrest "catches" the little tab on the door. Slide it down and align it top to bottom and left to right if needed. Then push along the edge, one snap at a time, and pop them in. Often they don't line up exactly with their holes, use a flat blade screwdriver while looking behind the panel to push them side to side or front to back to get them to line up, then pop them in. The bottom edge is usually the toughest. FINALLY, put the handles back on.... Older models, you will be tapping those pins back in with a punch or a nail. Button up, clean up, take the tape off and slam that puppy a few times. Nice huh? Congratulations, hope you met your own expectations, at
a minimum I bet you at least learned something..... One Piece Windows These kits are very popular, and still quite reasonable. I have installed them in two of my Beetles and think that they really streamline and simplify the shape of the car (but as I have aged, the vintage purist in me sneers at them). Installation is not that bad, but there are a couple quirks to them. If you jumped to here, you may want to read the disassembly text above, as I will refer to it often. If you are really unfamiliar with these kits, they replace both windows (the moving one and the vent) and consist of glass for both doors, weather stripping, felt channels and (usually) instructions. The major points are:
On the high level, the installation goes like this:
Remove the existing glass and remove the sash from it- See "Disassembling the Door" text above. Remove the existing felt channel- See "Disassembling the Door" text above Remove the vent wing window and its frame as a unit- See "Disassembling the Door" text above. Remove the inside and outside window scrapers- See "Disassembling the Door" text above. Cut a small tab away that bridges the window slot near the front- You can cut that tab off with a hacksaw, but be careful not to scrape up the sill edges. If you do, paint them with something, you don't want rust starting there. You will find this tab bridging the gap in the lower window opening just in front of where the back edge of the vent window frame was. Remove the existing door stop arm- There should be a little pin that holds the end of the rod at the A-Pillar side. It should have a tiny "C" clip in a groove holding there, either on the top or bottom. Carefully pry it off and DON'T LOOSE IT! You will need it for the "After-market" type doorstops. Remove the pin and the stop rod will then slide all the way back into the door and you can pull it out from there. Glue in the new seals, inside and outside- I think some of the better window kits come with "snap-in" seals, much like the ones you took out. That is fine, but my problem with these seals was not just getting them fastened in place. Your kit will give you 4 straight scraper seals (unless some new contoured ones have become available since I wrote this article), 2 for each door, one inside one outside. They are long enough, but they don't curve up at the ends to follow the curvature of the window opening at the front and back where it meets the felt channel(s). I used to see custom cars at the show with impeccable custom touches and detail and yet these scrapers were not bent up at the front. It just looks like a real misfit/kludge to me. The window opening curves up but the seals go straight. But it has been many years since I ordered a kit, I don't know if curved seals (scrapers) are now available. Before I tell how I solved that problem, let me talk about fastening stuff in general. The farther along I go in life, the more I am convinced that silicone adhesives are superior on many different surfaces. I use the "GE II" silicones from a standard size caulking tube. I buy the stuff at Home Depot for around $3-4 a tube, I like "clear" best. I was told that only the stuff with a strong odor was the good stuff for sticking things together (GE II stinks) . It has a strong vinegar-like odor (that's the only thing that comes to my mind). I strongly recommend this stuff to glue your scrapers in. Believe me, I have tried probably a hundred other glues, sealers, gunks and goops; and NOTHING comes close to this stuff. I even think that a window kit I bought once came with a sealer, but it wasn't silicone and wasn't nearly as good. Here are some important tips:
Sometimes the stuff still dries a bit in the nozzle. If it does, use a very small, thin flat blade and stick it down in there and go around to separate the dried silicone from the inside of the nozzle tube. You can then usually put it in the gun and squeeze a dried silicon "worm" out before you get the wet stuff. Never tried using those silicone worms for fishing, seems like they might work though. E-Mail me if you catch anything. And another tip if you are unfamiliar with caulking guns: it may seem impossible to dispense just a bit of silicone out of the tube, and not have it drip and ooze another 2 feet of wet stuff after you put it down. Most caulking guns have a "release" button in the back end, the one you push to pull the plunger out and remove the tube. As soon as you dispense what you need from the tube, pop that button before you put the gun down. That releases any residual pressure in the tube and makes it stop oozing immediately. So, glue those seals in, don't be stingy with the silicone
and don't worry if any squishes out of the top between the seal and the door.
DON'T try to wipe it off. Wait for it to dry completely, then carefully use a
new razor blade to trim it off. It is MUCH easier to trim big bulges and blobs
of dried silicone rubber off, than thin, smeared layers. And you may have to
get creative finding a way to hold the seals in place while the silicone dries
(especially if the seals are not perfectly straight). Once I made little
wedge-shaped blocks out of wood beforehand to wedge up in the gap from below,
inside the door, between the two seals. You really can't do much from above as
the seal "lips" almost touch each other and jamming something between them will
cause the lower edge of the seal to pull away (I remember lots of cussing).
Wooden clothespins might work well. The trick to putting a curve in those seals at their ends is to slit the underside of them (the part that is below the door sill and glued to the door) with a carbide disc on a Dremel tool (the seals have a steel core in this area) about every 1/2" on the last 4" or so of the scraper. This allows you to bend the end up. Takes a lot of patience and "bending and fitting". If you bend too much, the seal will get a "notched" look instead of a smooth curve. And, after they are glued in, get the silicone back out and from below with a finger, smear silicone over the seal strip where you cut the slits. This is to keep water off of the metal you exposed when you cut the slits and prevent rust. Take your time and you can make this seal look pretty nice.
A nice curve at the ends that comes up and meets the felt channel looks nice and
"factory". Remember, it is not meant to (can't) be perfectly water tight. Next
time you go to the VW shows and see those super shiny modifieds, check out how
many of them have one piece door seals that look worth a damn. Replace the regulator if necessary- Now I have no experience in putting these 2 point regulators into either '64 and older or '70 and newer doors, but I know it can be done. I would think that putting them into the newer (single point lift) doors would be a cinch. The older doors with the "clock spring" type regulators may require you to fabricate some mounts and/or drill some new holes. Re-install the sash on the new glass- See the text above on "Removing/replacing the glass". All you need to do is to remove the sash from the old glass and re-install it on the new one-piece glass, making sure that it is positioned the same distance from the back edge as the original window Install the new felt channel- See the text above. The one piece kits come with a single (long) felt channel that will go from just past halfway down in the inside of the door along the back edge (just like the original) all the way up across and down the slope in the front. It will end just above and behind the top hinge. You should use the original toothed "clips" to secure the channel, but you will need a little help in the area where the vent window was, as there wasn't a channel there to start with. My recommendation is to either go find an extra 2-3 clips and screw them up in there with sheet metal screws, or just use a thick bead of silicone (clean first) under the channel. The advantage of the first method is that the channel is easily removable. The disadvantage is that the sheetmetal screw heads may interfere with the channel sitting down flush inside the clip. You decide. Install the new glass and re-fasten the regulator to the inside of the door- No different than the original window, see the text above. Install new cable or strap door stops-You CAN'T use the original door stops and you SHOULD have some kind of door stop. If you don't, next time you open your door on a windy day, the wind will catch your door and flap it all the way open slapping the front fender and bending the crap out of the hinge mounts, drip rail and A-pillar. This WILL happen. After market "flexible" door stops are made (check parts vendors). I have seen 2 kinds. One is a fabric strap that connects to a ring through which that little pin goes at the A-pillar and you attach a small bar to the door for the other end. The strap just folds up when the door is closed. Advantage: cloth won't scratch up paint. Disadvantage: May require you to modify door slightly, won't weather well. The other kind is a steel cable "loop". One end has a rubber coated plug about 3/4" around on it. You slip it through the original door stop slot and use the pin in the other end of the loop on the A-pillar. With the door closed, the cable and plug do go into the door, but the cable is flexible enough that it allows the plug not to press into the window glass when the window is down. Advantage: Strong Steel, no mods; Disadvantage: mine scratched up the paint around the slot after a while. Anti rattle measures- Many people have complained that these kits rattle in the doors, mine (in two cars and many, many miles) never did. But I did notice that with the window down all the way, it's lower edge all the way up front, is quite close to the door skin. So I glued a piece (about 3"x5") of thick carpet there to the inside of the door skin (w/ silicone) right next to where that front corner of the glass came to rest with the window all the way down. Seems like a good idea. See the text above about "Sound deadening"; any of those materials mentioned would work. Replace the liner plastic and door panel-See
text above. You're done!! Common Problems Drafty, leaky doors- See text above "The Sealing". Check outside door handle gaskets and condition of scraper seals. Stiff, creaking hinges- See text above "Door "Resto"- Fixing Stuff" Door panel warpage, loose panel- Check to make sure that the panel has a clip in all of the places that it is supposed to and that it is secure in it's hole. Look for water damage on the back of the panel indicating a torn or missing liner (99% of the time the cause of panel warpage at the bottom). Replace liner if needed. See text above on "The Sealing". Consider replacing panels Sagging, mis-aligned doors- This is unfortunately tough to fix most of the time. Lift up and down on the handle hard with the door almost closed, is there play? If there is, you probably have either a very worn hinge pin (or two), the hinge mounts are loose (bolts) or the bottom of the A-pillar is rotted out so badly that it is moving. Look at these areas as you lift the door up and down. Unfortunately, there is no one cause of sagging doors, but they are almost always difficult to remedy. They can sag from accident damage, A-pillar rot, worn hinge pins or just general old age. This is especially important for convertibles. See text above "Door "Resto"- Fixing Stuff". Some times the (welded) hinge mount on the door is bent, and replacing the door is what is needed. And I'll bite my lip and tell you about a couple of remedies that I have used in the past that have worked, but they are Band-Aids at best. One is to open the door just about 6" at the back and apply some upward pressure using a floor, bottle or scissors jack to the underside of the back corner. But put a narrow block of wood along the bottom edge of the inner door, not on the lip that holds the door seal in place. Jack it up until the side of the car starts to lift up, then let it down and try closing it. Go a little at a time. The other thing I did once was to loosen, almost all the way out, the lower hinge bolts and then slipped a big fat washer (as a shim) between the hinge and the A-pillar, then retightened the bolts. This did solve my problem, but I knew that I was only rigging something, not treating the actual cause of the problem. Make sure you read "Getting those doors OFF!" above if you attempt to loosen or remove those bolts that hold the doors on. Rattling, noisy, hollow sounding doors- See text above "Sound deadening" Sticky windows (hard to roll up and/or down)- There are really two root causes for this. Either the window is being interfered with while sliding up and down in the felt channels, or the regulator is sticking, under-lubricated or broken. And it could be a combination of these things. Pull the panel and liner, disconnect the window from the regulator and try both things separately. Try to lift the window up and down with your hand. Does it go freely? If it hangs, inspect the felt channels carefully and remedy. Remember that the rearmost channel on the newer doors is adjustable front to back to give the window more play. If it wobbles going up, the channels may be too loose. Look at the sash (that metal channel that "grips" the bottom of the window glass), especially the underside. These are known to rust out and loose their grip on the glass. Try the regulator with the glass detached. It should be smooth, quiet and not bind. If not, take it out, inspect, clean and lube or replace. Window crank "skips", turns but window doesn't move- Either the regulator is bad, or the crank is either loose on the shaft and/or stripped out the splines. Take off the handle and inspect. If it is the newer kind held by a screw, I always use some "Locktite" on the screw before putting it back in. They are notorious for coming loose and will strip out splines if they are not kept tight. If the crank and shaft turn but the window doesn't move, the regulator is probably bad. If the window goes up, but doesn't go down unless it is pushed by hand, the sash might be rusted out and detached from the glass and need to be replaced (see "Sticky windows", above) Window broken (vent or main)- See "Removing/replacing the glass", above Window is loose, wobbly, tilts front to back when winding up or down- See "Sticky windows" symptoms above. Most likely loose, deteriorated or missing felt channels; or a rusted out, loose sash. Door looks like crap- See "Door Resto-",
above |
|
Send mail to
eagleeye@searchmalta.com with
questions or comments about this web site.
|